Tuesday, October 31, 2017

Happy Halloween!

Happy Halloween!   

I've decorated outside with three tomato cage ghosts.  My tutorial can be found here.


We decorate the walk leading up to the front door with orange lights.  It doesn't show in the photo, but some of the lights look like little candy corn.

The gravestones are about as spooky as we get.  

I have the candy out in the big orange bowl ready for trick or treaters.

I made this little quilt from charm squares.  My tutorial can be found here.


This is the mantel.  It's really more fall than Halloween.  There are pumpkins and little gourds mixed in with the leaves that don't really show in the photo.  I'll leave those decorations there until I decorate for Christmas.  I really love fall.

The tutorial for this little quilt can be found here.  You sew these charm squares (or any 5" square) together in a rectangle and by cutting it as shown in the tutorial you have an on point quilt.


I hope you are having a fun Halloween filled with chocolate.


I hope you are finding some time to stitch today!

Thanks for stopping by for a visit!


Tuesday, October 24, 2017

Keeping Busy This Summer

I've been having a lot of fun and doing a lot of traveling this summer.  Most of my travels were quilt related.   

I just got back from 10 days vacation in the Smoky Mountains. I really love going to Tennessee.  I've been there twice.   I'll do a separate post on the retreat I went to in Sweetwater, Tennessee.

I've been back and forth across the Ohio River several times-so many that I've lost count.  I just got home Saturday night from a wonderful few days at my friend, Michele's.  We really sewed a lot and slept very little.  I'll show photos of what I finished there in another post.   


Earlier this summer, I taught my Sunburst Hexagon Table Topper class for some of the ladies from the Greenwood Quilt Connection guild.  The class was held at Back Door Quilts in Greenwood.


I did a trunk show for the Greenwood Guild.  I love meeting and talking with other quilters.  


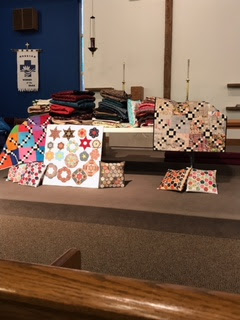
I also did a trunk show for the Brownsburg Scrapbasket Guild.  Here is my pile of quilts and pillows before the trunk show.


The guild posed for a group photo before the meeting.   

One of the ladies had purchased my pattern and showed her table topper at show and tell.

This is what my house looks like the morning after a trunk show.   It takes awhile to put all of the quilts back in their places.

I've also been to Shipshewana 3 times so far this year.  The next two photos were taken when I went to the Shipshewana Quilt Festival. 

The flower basket in front of the Blue Gate.


Blue Gate Restaurant.   

I've been south to Madison, Indiana a couple of times to shop at Margie's Country Store.  The trip to Margie's always includes crossing the Ohio River and going into Kentucky to meet Michele, Barb and Meredith at Hometown Pizza in Carrolton, KY.    You know that you always make better fabric decisions on a full stomach, right?


This is Margie's basement.  It is a gift shop with all kinds of neat things.

I went over to Terre Haute, Indiana, with my daughter to see the Raleigh Ringers handbell concert.  They haven't been in Indiana for several years, and we never miss a chance to see them perform.


I went north to Marion, Indiana, with friend Theresa to the Quilter's Hall of Fame.  Brenda Papadakis received a Lifetime Achievement award from the Indiana State Guild that evening.  We have both been part of the Dear Jane group of quilters for.....maybe 20 years.  Theresa was there from the beginning - even before the book was published.  I started shortly afterwards.


I went back down by the Ohio River another time to the Lawrenceburg one stop shop hop.   I don't have any photos from the shop hop, but here is the river again.


I've also been to the Children's Museum of Indianapolis a few times with one of my favorite guys.


I'll try to keep updating my blog.  I'm sewing 3/4" hexagons with a group over on Instagram.  It's not the same as a blog post, but it's a snapshot into what I'm doing.
You can follow me there at loosethreads_luann
I'll post photos of the hexagons in another post.  

Thanks for visiting my blog.

I hope you are finding some time to stitch today!

Monday, July 17, 2017

Lucy Boston Framed Tutorial

Hello Everyone

I have been making a few more Lucy Boston Patchwork of the Crosses blocks this past week and thought I would write a tutorial on how to fussy cut fabrics to make the frame around the outside round of a block.  

I am doing this tutorial for myself as much as I am those of you that want to get that "framed" look in your blocks.   Whenever I find a striped fabric that I think would work to frame the outside round of a POTC block, I have to puzzle just how to go about placing my templates.  

I like to make my own templates that I use for fussy cutting English Paper Piecing.  I simply trace one of my paper pieces (in this case 1" Honeycombs) and then add 1/4" to 3/8" around the outside.  I sometimes make extras of my templates to carry with me when I go shopping so I can audition a fabric in my window template.  If it gets lost along the way, it doesn't take a lot of effort to make another template.

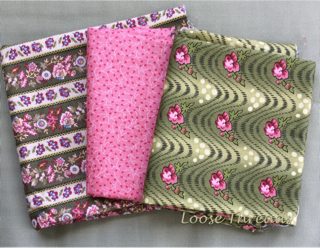
A Lucy Boston block takes 24 paper pieces.  Most blocks use 4 different fabrics and have 4, 4, 8, and 8 of each fabric..  When you do a block with an outside frame you need 3 fabrics using 4, 4 and 16 of each fabric.  I chose the fabric on the right (Di Ford-Hall) with the flowers to fussy cut the center 4 blocks.  The other 4 cut from the pink are Kathy Hall fabric.  Both are by Andover.  The stripe is a Kaye England fabric (Wilmington I think) and is narrow enough to use for the outside frame.

I centered the flower in my window template.  I left a little bit of the pink flower below in the window at the bottom.  That will make a little pink flower in the center of the block where the pieces meet when it's stitched.  

I traced as shown below with a permanent marker.  I like to do my fussy cut EPP pieces this way because it makes good TV work in the evenings to cut them out with scissors.  You can always use an acrylic template and rotary cut your pieces if you choose.

For this tutorial I made 3 window templates.   You can see how I drew the lines on each template.  This is where you will line up the stripe on your fabric.  The lines on the templates are drawn approximately an inch down from the top.  The lines drawn on the yellow and pink template match along the edge where they will meet the green template (see arrow)  and stay parallel (note the 1" mark along the top of the template where you draw the line on the other side).


The line on the pink template bottom will line up with the next green piece the same as the yellow template.  Line your ruler where you see the pink arrow and keep it parallel to draw the other line.  


Then I drew arrows so I know which way the template will be placed on the fabric.


Cut 8 from the green template, 4 pink and 4 yellow from the fabric.  Note how the lines on the templates are all placed at the same point in the stripe on the fabric.

Here are the pieces cut out before glue basting to the Honeycomb papers.


Line up the corners of the paper to match that point in the stripe where you see the arrows.  


Here they are all glued and ready to stitch.  

This is the finished block.  I wouldn't want to do this to every block in my quilt, but I think a few fussy cut this way add some interest.  


Today I'm linking up with Design Wall Monday.  I'm glad that my friend, Judy from Small Quilts and Doll Quilts has taken over hosting Design Wall Monday.  

Thanks for stopping by for a visit.

I hope you are finding some time to stitch today.  

Print This Post

Related Posts Plugin for WordPress, Blogger...