
I'm editing this post so that you all know that this method of making continuous bias binding was not my original idea. I found a tutorial on one of the quilting self help sites, and followed it step by step and came up with this. Actually I ended up with 2 of these "hats".....so I wrote my own tutorial.

This is not the traditional way of making continuous bias binding, but I always seem to get the triangles of fabric in the wrong place. So here is a tutorial of a method that I found to make continuous bias binding that I think is quick and easy.
I first bought a 3/4 yard of fabric. You need to begin with a square. My square is 27".

Fold this square in half with right sides together matching the selvages. Sew around the 3 sides using a 1/4" seam. (Don't sew on the folded edge.)

Now you can turn your sewing machine off. This is all of the sewing you need to do.
Draw a diagonal line from one corner to the other.

Clip the corners where you just drew the lines.....

 Now flip the square over and repeat the last step on the opposite corners (the ones that are NOT clipped yet). After you've drawn this line, clip these two corners.

Carefully cut on the lines being sure to cut the layers separately.


Now draw lines on the tube the width of your preferred binding. But, don't draw these lines all the way to the top....stop about 6 inches from the top of the tube.

This is a better photo. With your rotary cutter cut the binding strips stopping approximately where you see the line in the photo below.


This is not the traditional way of making continuous bias binding, but I always seem to get the triangles of fabric in the wrong place. So here is a tutorial of a method that I found to make continuous bias binding that I think is quick and easy.
I first bought a 3/4 yard of fabric. You need to begin with a square. My square is 27".

Fold this square in half with right sides together matching the selvages. Sew around the 3 sides using a 1/4" seam. (Don't sew on the folded edge.)

Now you can turn your sewing machine off. This is all of the sewing you need to do.
Draw a diagonal line from one corner to the other.

Clip the corners where you just drew the lines.....

You just need to clip enough in order to be able to get your scissors in between the fabric layers.


Carefully cut on the lines being sure to cut the layers separately.

Now pick the fabric up and form it into a tube. Press the seams.

Even up the edges.

Now draw lines on the tube the width of your preferred binding. But, don't draw these lines all the way to the top....stop about 6 inches from the top of the tube.

This is a better photo. With your rotary cutter cut the binding strips stopping approximately where you see the line in the photo below.

Now pick up the tube and rotate it until the uncut portion is centered on the cutting mat.
Draw lines to connect the strips on the bottom with the next one diagonally on the top as shown in the photo below. Next cut on these lines with scissors.

That step is hard to explain but hopefully the picture will help explain it.
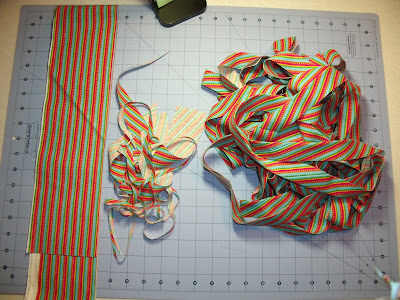
Press the binding in half. From 3/4 yard of fabric I ended up with 8 yards 7 inches of binding.


Below is bias binding that I made from a yard of fabric. The piece at the left is left over from cutting the square and can go in my scrap bin. The little pile in the middle is all of the waste from making the binding.

I really like this method and hope you will give it a try.

If you have any questions please don't hesitate to email me at krugla@gmail.com
Thanks for stopping by for a visit!

Clever!
ReplyDeleteThis is actually how I make bias binding too! Great tutorial, I always need to refer to the book I found this technique in when I need to make it cause it can be confusing but your pictures really help. I too love a striped binding on the bias - simply fabulous.
ReplyDeleteI've tried making continuous bias another way, but your way seems much simpler, so next time I'll try your way out.
ReplyDeleteThank you for the tutorial. Will definately be giving it a go.
ReplyDeleteA great tutorial and I can't wait to try it. Thanks for taking the time to give us a tutorial
ReplyDeleteWow! I can't wait to try making binding this way. Thank you!
ReplyDeleteWow! I've never seen it done that way. It looks so much easier. I usually cut all my bias strips;then sew them together. It makes great bias binding, but time consuming. I'm giving your method a try! Thanks!
ReplyDeleteThank you for the tutorial - I was with you most of the way while reading the instructions but I think I will have to actually make the binding while reading your instructions before I fully "get it"! Your finished binding does look good.
ReplyDeleteThanks for the info - this looks easy! How wide do you make your binding? It looks like the strips are about 2 1/4" but the finished product looks much wider than that!
ReplyDeleteI think I get it...I need to go try it and see. If I can figure it out, this looks FANTASTIC!
ReplyDeleteIn stitches,
Teresa :o)
Well aren't you the clever girl? I enjoyed this very much, and I need to make some bias binding in the next few weeks, and have been dreading it! I'll give your method a try for sure!
ReplyDeleteA good description, thank you!
ReplyDeleteI sent you lots of visitors from Hungary!
Edit
Excellent tutorial! I love striped bias binding. Thanks!
ReplyDeletelooks do-able. I'll have totry it, thanks for the step by step photos, too ~
ReplyDelete:-}pokey
Thanks for the very timely tute! I have a project currently in process with a striped fabric already picked out for a bias binding. I've tried a number of techniques for creating continuous bias binding but have never been able to get them to work right (except for cutting seperate strips and then seaming them together).
ReplyDeleteSo I look forward to trying this one out!
I cannot begin to imagine how you figured this out, but it is genius and so simple. Thanks for taking the time to take all the photos and share it.
ReplyDeleteLove all those stripes!
That looks pretty cool. I will read it later step by step as I don't care for the traditional method of the continuous bias binding! Thanks for sharing!
ReplyDeleteI've never seen this method before. Great tutorial LuAnn - Thanks for posting it!
ReplyDeletelooks great must try it out...
ReplyDeletex x
Hi LuAnn.
ReplyDeleteGreat tutorial!!!
Thaks for posting it...
That is much easier then I thought and I will give it a try one day.
ReplyDeleteAlright LuAnn! This is a very cool way to cut some of that continuous binding with the rotary cutter instead of miles of it with our regular scissors. I am certainly going to remember this the next time I need bias binding.
ReplyDeleteGreat tutorial! Do you have a typical binding width you prefer when using bias binding?
ReplyDeleteLuann thanks so much for this tut...I am going to give it a whirl...appreciate it.
ReplyDeleteThat is just great and so clear. I am going to do this method from now on. Thanks for a great tutorial. Hugs Vicki x
ReplyDeleteI will definitely try this!
ReplyDeleteThanks, LuAnn! I learn something new every day.
ReplyDeleteI must give your method a try! I "hate" making my bindings, maybe this will make it easier ;). Thanks for sharing.
ReplyDeleteI once tried a method similar to this and was very frustrated with it. Your instructions are great and they deserve another try next time. Many thanks for sharing.
ReplyDeleteThanks for a great tute LuAnn. Looks easier than what I have done. Must give it a whirl!
ReplyDeleteTHANKS!!! I have earmarked this, I can NEVER remember how to do this when the time comes for the binding!
ReplyDeleteI have what might be a dumb question about this method. In the step where it says "Draw lines to connect the strips on the bottom with the next one diagonally on the top as shown in the photo below. Next cut on these lines with scissors." do you not get crookedness there? In the picture it looks like a definite angle where they are offset (toward the top of the picture).
ReplyDeleteI have not seen this method before. Looks like a good one!
ReplyDelete