Hello Everyone I didn't mean to be away so long, but I've been busy!
I try to be loyal to my readers, and I know that I had said that I would post a tutorial for the hexagon pillow that you see in the photos below. In the meantime, the owners of Back Door Quilts saw my pillow at English Paper Piecing addiction group last week and asked if I'd write my pattern. As a result, I have self published the pattern, and they have bought several copies to sell in their shop and at quilt shows. I've also opened an Etsy shop where you can buy the pattern as an instant download. Here is the link LuAnnsLooseThreads Etsy Shop
I will also be teaching a class on this pillow at Back Door on September 21.
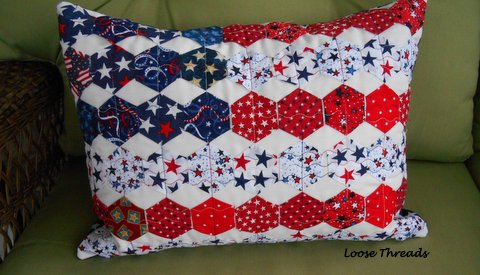
Charming Hexagon Pillow


I don't feel that it's fair to those that have purchased the pattern that I post an entire tutorial here. I hope that you understand.
I will give you some limited directions though.
The pillow measures 14" X 14"
The hexagons are 1" and are NOT raw edge.
I have used mini charm packs and/or 2 1/2" squares of fabric from my stash to cover the hexagons. Then they are machine stitched to the background grid. There is no hand sewing on this pillow.
These pillows are pretty addictive as you can see from my photo and are a great use for all of those mini charm packs that we've all bought because they were cute but didn't really have a plan for them.
I have several of these pillows in progress and will post them in a couple of days.

I try to be loyal to my readers, and I know that I had said that I would post a tutorial for the hexagon pillow that you see in the photos below. In the meantime, the owners of Back Door Quilts saw my pillow at English Paper Piecing addiction group last week and asked if I'd write my pattern. As a result, I have self published the pattern, and they have bought several copies to sell in their shop and at quilt shows. I've also opened an Etsy shop where you can buy the pattern as an instant download. Here is the link LuAnnsLooseThreads Etsy Shop
I will also be teaching a class on this pillow at Back Door on September 21.
Charming Hexagon Pillow
14” X 14”


I don't feel that it's fair to those that have purchased the pattern that I post an entire tutorial here. I hope that you understand.
I will give you some limited directions though.
The pillow measures 14" X 14"
The hexagons are 1" and are NOT raw edge.
I have used mini charm packs and/or 2 1/2" squares of fabric from my stash to cover the hexagons. Then they are machine stitched to the background grid. There is no hand sewing on this pillow.
These pillows are pretty addictive as you can see from my photo and are a great use for all of those mini charm packs that we've all bought because they were cute but didn't really have a plan for them.
I have several of these pillows in progress and will post them in a couple of days.
I hope you are finding some time to stitch today.
Thanks for stopping by for a visit.