A couple of weeks ago I taught a fussy cutting class at Back Door Quilts here in Greenwood, Indiana. I enjoy fussy cutting, talking fussy cutting, looking at fabric for fuss cutting.... Well, you get the idea. I enjoyed getting together with others that are interested in learning. I cut kits for the class and included paper pieces, templates, marking pen and fabrics.
Here are some examples of some of the French General fabric that I enclosed. I showed a 1" hexagon, 1" jewel, and 2" 60 degree diamond. I also basted 3 hexagons for each student. One was thread basted through the paper, another had the fabric tack stitched at each corner, and the third was glue basted.

In these photos, I show you how you can fussy cut a hexagon. This is the same hexagon, but in this second photo the hexagon pieces have been turned 180 degrees. When you baste your hexagon pieces, take time to audition them in different arrangements. Sometimes you end up sewing the pieces together in a different way than you intended when cutting. I call that a "happy accident". In the photo above, you end up with the white lines creating a secondary design that forms a wonky star. In the hexagon below, at first glance you see a white circle in the center. It all depends on which way you like the best. In fussy cutting there is no right or wrong way to sew a block together.
Here is the example of the 60 degree diamond. Sewing it together as in the first photo, there is a red circle with a blue center.

But in the second star you get a red flower in the center with a white star as a secondary design.
The last shape we worked with was the 1" jewel. Below the 1" jewel is shown with the points together. This layout ends up the same size as a 1" hexagon flower.

Here the 1" jewel has a hexagon in the center . You can see how you get a totally different look depending on how you arrange and sew your pieces together
This is the first hexagon that we worked on in class. I love how the two stripes in the outer round gives the whole block a totally different look.
I also included some Di Ford fabric to make the hexagon in the center below. That fabric (I have it in both color ways), is really great for fussy cutting.
Below is the same fabric in the teal color.
Here is another example that I took to class. I also took along several different quilts to show examples.
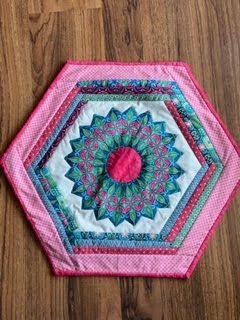
The table topper below is made from my Sunburst Dresden Table Topper pattern. It is available in my Etsy shop or at Back Door Quilts. I made this as an example that you can fussy cut shapes other than those that are for English Paper Piecing.
Every one also got the fabric and pattern to make this snowman mini quilt. The snowmen are fussy cut from a fabric that I bought at Back Door Quilts.
Here is another shape that I fussy cut. These paper pieces were a gift from my friend, Rosemary. Right now I don't remember the name of the paper pieces.
 The first block of my Antique Wedding Sampler has a bit of fussy cutting. The pattern for the quilt is in Di Ford's book, Primarily Quilts. I love every quilt in that book, and I have a lot of the original border fabrics that she used in her quilts in the book.
Here is another block from my Antique Wedding Sampler. The center is fussy cut. I ended up hand piecing that little star. It's pretty tiny.
I've been cutting and sorting some of my stash. I cut, sewed, and donated 30 pillowcases
to the group at church that sews charity items.
I sewed with Quilters United yesterday and turned in 30 Christmas stockings for next year, 12 burp pads and a few quilts made from kid friendly fabrics. I've been keeping pretty busy.
Here are the links on my blog to my fussy cutting tutorials:
Fussy Cutting Tutorial
http://luannsloosethreads.blogspot.com/2014/02/fussy-cutting-tutorial.html
Lucy Boston Framed Tutorial
http://luannsloosethreads.blogspot.com/2017/07/lucy-boston-framed-tutorial.html
Thanks for stopping by for a visit.
I hope you are finding some time to stitch today.


