Sunday, September 30, 2012

Small Halloween Quilt

I've been working on a few Halloween projects this month.


This little quilt measures 14" square.  The half square triangles are 1 1/2" finished.  I made them from leftover 5 inch squares from another project.


Here's how I made them.  Put a dark and light charm square right sides together.  Draw a diagonal line on the back side of the lighter charm square (the black lines).  (I know this isn't a new idea but it made this a quick to put together project.)


Sew 1/4 inch on both sides of the diagonal lines (where I have drawn the red lines).


Cut down the center vertically.


Cut down the center horizontally.


Now cut these four squares diagonally where I have drawn the black lines.


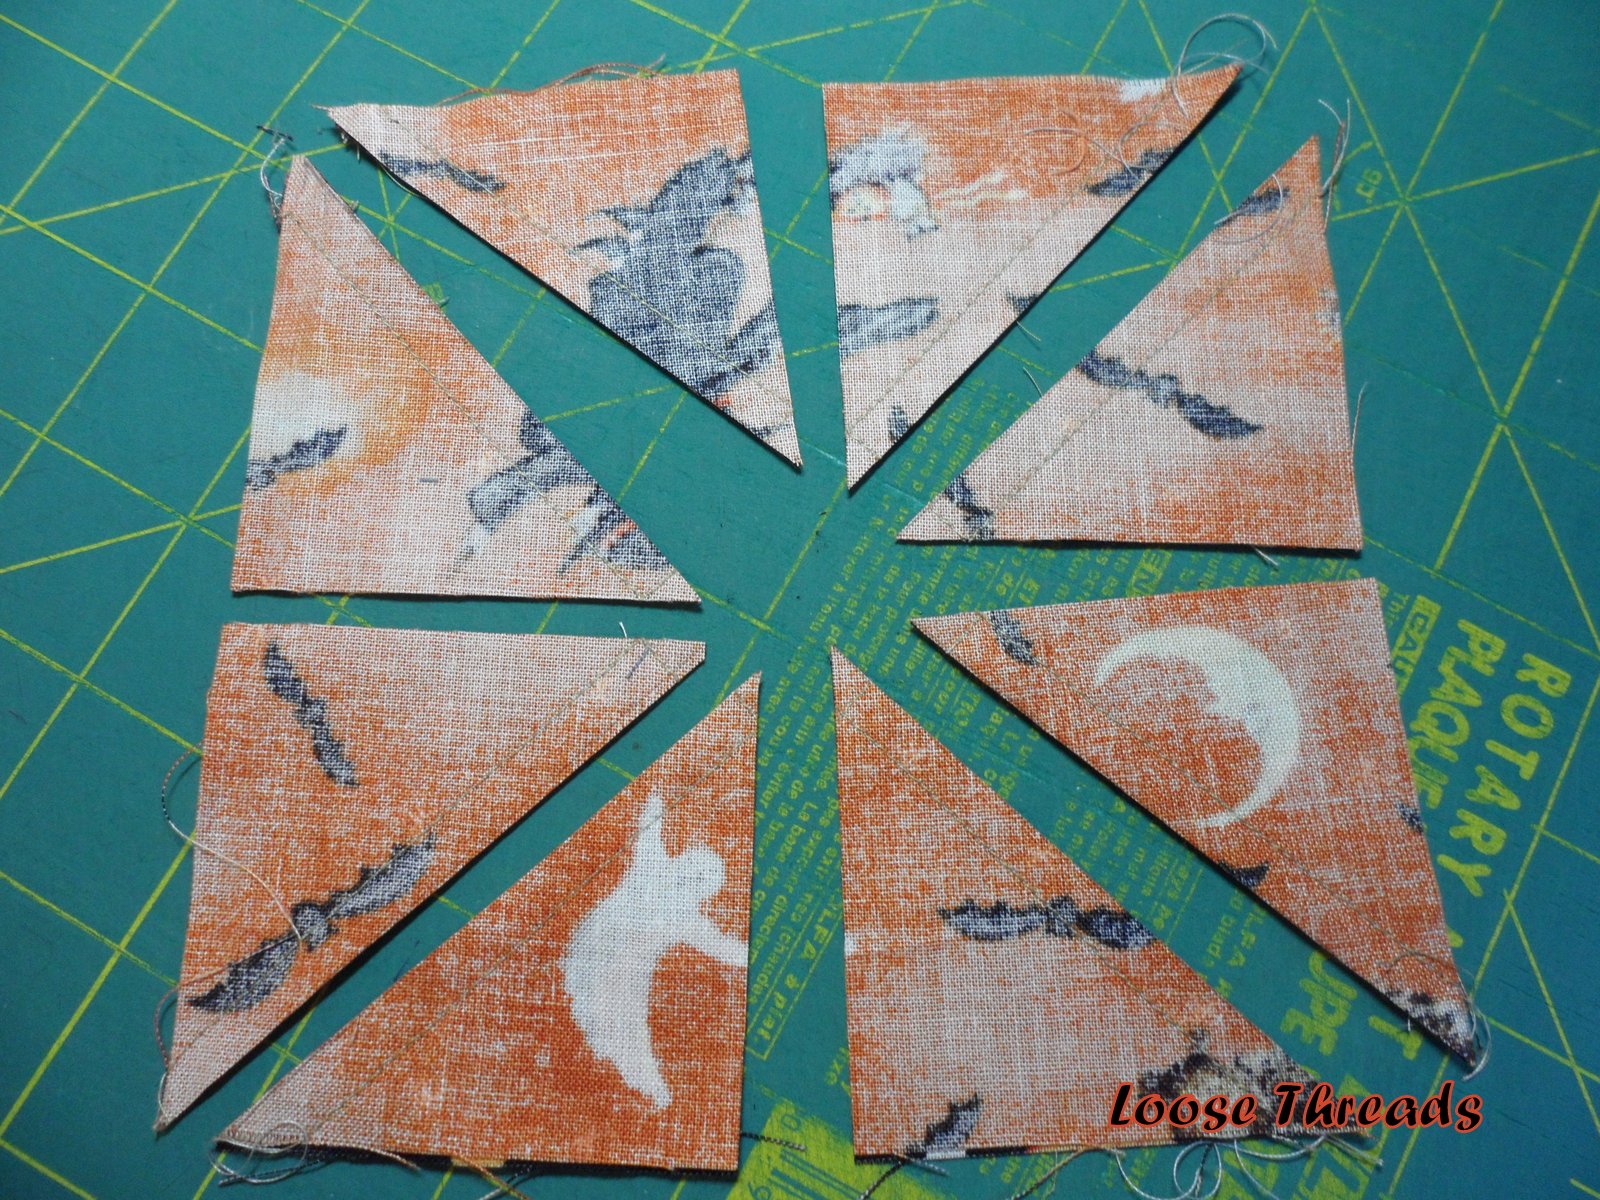
You have 8 half square triangles.  You can also draw the lines on the back of the light square and cut your charm squares in half once before sewing any of the lines.  That way you can mix the darker squares to get more variety in your half square triangles.


I started out making broken dishes blocks for this little quilt but since there would be an odd number of blocks, I just made a few of these and then filled in with half square triangles.  It wasn't quite what I had planned, but it gave the quilt a more scrappy look.


Oh, and in case you're wondering what is in the dish......


White chocolate candy corn M & Ms.  
Posted by Picasa

Thanks for stopping by for a visit!  

Monday, September 24, 2012

On Point Quilt from Charm Squares


This is my latest attempt at turning a rectangle of charm squares into an on point quilt.  (OK.  This is my third time, and you know what they say about the third time!)

This little quilt measures approximately 32 inches square and uses less than two charm packs.


Sew 72 charm squares ( or 72 5-inch squares cut from your stash) together into a rectangle.  The rectangle needs to be a 1:2 ratio so for this one I chose 6 squares by 12 squares.


Cut the rectangle as shown in the photo below.


I forgot to take a photo of how to rearrange the three triangles to sew them back together.  You can see a photo of it in this post.  

Now trim off the outside as shown leaving a quarter inch seam allowance around the outside edge of the quilt.  This is approximately half of each of the outside row of charm squares.  


In order not to waste this fabric that I just cut off, I laid the diagonal line of my 2 1/2 inch ruler on each diagonal seam and cut a 2 1/2 inch (unfinished) half square triangle.  


I ended up with 44 half square triangles to save for another project.


Or they could be used for a pieced border on the quilt.  


By trimming off the outside this way, the points around the outside won't be lost whether or not you sew on a border or just quilt and sew on the binding.

The fabric I used is Strawberry Fields by Fig Tree for Moda.

I hope you are finding some time to stitch today.

Thanks for stopping by for a visit!

Saturday, September 22, 2012

Rainbow Scrap Challenge Orange Saturday


I had a small pile of orange fabric scraps left over from a Halloween project that I've been working on, and I decided to sew these 3 1/2" string blocks for the Rainbow Scrap Challenge this month.    I'm not sure whether I'll make these 16 little blocks into one project or keep them for a larger project.

 
To see what others are doing with their orange scraps this week, visit So Scrappy blog on Saturday morning.

Thanks for stopping by for a visit!

Wednesday, September 19, 2012

Simple Yet Beautiful Quilts

I love seeing how people use quilts in their home.  I recently found this new to me web site http://www.houzz.com/    There is a search box on the site, and when I put in the word quilt these are just a few of the photos that I found.  There is an "Embed On Blog" button next to each photo, with the name of the designer listed below each photo.  

What struck me about these quilts is how easy they would be to make.  This first quilt looks like it was made from a layer cake (or two) and the shams were made from charm squares.  I think the quilting is what makes this quilt interesting.  It looks like straight line quilting that alternates direction with every block.  


Traditional Bedroom design by Denver General Contractor Teton Heritage Builders


Again these look like layer cake squares but ten inch squares could just as easily be cut from fabric on hand.  This quilting looks like straight line all the same direction.  

Traditional Kids design by Denver Interior Designer Zeal Denver


Here are more layer cake and charm squares.  

Traditional Bedroom design by Minneapolis General Contractor Lands End Development - Designers & Builders


This quilt looks like a mix of plaid and floral squares, and the quilting is a diagonal grid.  

Traditional Kids design by Burlington Architect Joan Heaton Architects


Love this rail fence.  The neutral colors and wide strips give it a modern look.  


Time to stop dreaming and head to the sewing machine.  

Thanks for stopping by for a visit today!

Saturday, September 15, 2012

Squares to An On Point Quilt Again


Here's another try at taking a rectangle of squares sewn together to make an on point quilt.  I got a few comments and e-mails with concern over losing the points on the outside round of my Halloween table topper (see earlier post).  I cropped the top of the photo below too close so it looks like I will lose my points in the border seam allowance, but they are still there.


Here is the layout of the squares.  The only problem with this one is where to make the cut.  In the end I had to sew another green triangle on one corner of the quilt to complete the square.  This layout is 6 X 10 squares.  


Here is a layout that I tried.  The empty spaces are white squares.  That doesn't show up too well in the photo.  I was trying to get a white square in the center and.......


Oops.  So it's back to the drawing board.

 
I'm having company this weekend, but stay tuned for the next installment of this project.  I'm working on yet another idea.

I had a BFO (blinding flash of the obvious) and realized that each time I try one of these experiments, I'm creating yet another UFO.  They will be good for machine quilting practice.

Hope you are finding some time to stitch this weekend!

Thanks for visiting!


Wednesday, September 12, 2012

Joining in a Crochet Along


I've joined in the Mixed Stitch Stripey Blanket Crochet Along going on over at Jules blog, Little Woollie.    Katrin  (Cattinka blog) first showed her progress on this crochet along on her blog.  I think Cyn (Cyns Quilted Travaels) and I saw it there at about the same time and wrote each other.  Then we wrote EllyD (Mad 4 Patchwork) to join in, and now the four of us are all working on the same crochet along together again.  The four of us have also worked on the Granny's Gone Wild Crochet Along and the Giant Granny Square quilt along.  It's a lot of fun to crochet along with these blog friends again.

Here is my progress so far:


I'm doing a blanket wide enough to fit our king sized bed.  I think this bed really needs some pillows!


I have loved this blanket since I saw it on the front of this magazine in March 2011.  
Posted by Picasa

The crochet along blanket is very similar to this one, but I think I'm going to like it better because Jules is adding a lot of variety in the stitches.  I really appreciate her effort writing out the pattern and showing great photos of her work.


Thanks for stopping by for a visit!  

Monday, September 10, 2012

From Squares To An On Point Quilt

This is my latest project.  I turned the rectangle of squares on the left into the little quilt on the right with just two cuts.


On one of the quilting boards that I read, there was a post from someone who said that to turn a quilt on point, they simply just turned it and trimmed away the excess.  That seemed like a lot of waste, and I thought there might be a better way.   


I had some leftover 5" squares from another project.


I sewed them together into a rectangle.   This will work if your rectangle is a 1:2 ratio.......4 X 8, 5 X 10, 6 X 12, 10 X 20 for example.   These are 5" squares so this rectangle is 18.5 inches X 36.5 inches after stitching it all together.


Now cut as shown in the photo below.  I tried to arrange my squares so that the "setting triangles", along where the cuts are made, would all be dark.  You will end up with 3 right triangles which will fit back together into a square.


Rearrange them as in the photo below.  Sew the two smaller triangles together first, and then sew this unit to the larger triangle.


You will end up with this little quilt.


I started with a rectangle 18.5 inches  X 36.5 inches and ended up with this little quilt/table topper that is approximately 26 inches square.


Thanks to my husband and daughter who helped me brainstorm this idea at breakfast yesterday morning.    I'll link this in my Tutorials and Patterns section on my sidebar.

Thanks to Judy for hosting Design Wall Monday at Patchwork Times this morning.    

I hope you are finding some time to stitch today.

Thanks for stopping by for a visit!  

Saturday, September 8, 2012

Machine Quiltin' By Iva


Here is another quilt shop I visited on our trip to the Smoky Mountains.  This shop is called Machine Quiltin' by Iva.   There's a lot to see in this shop.


The back wall is full of bright fabrics and a nice display of little quilts.


This is the batik wall....and this isn't all of the batiks they carry.


There is lots of inspiration in this shop with lots of samples to look at.


If you look at the shelves, you can see all of the pre-cuts that Iva carries.  There are more charm packs, jelly rolls, and layer cakes in this shop than I've ever seen in one shop before.  It is just amazing.....and also very tempting.


After I got home I realized that I didn't take photos of the two back rooms that are also full of fabric.  This shop is always on my list of places to stop when we head south.

 
Thanks for stopping by!

Wednesday, September 5, 2012

Cherry Pit Quilt Shop


First of all, I'd like to thank everyone who responded to my plea for help with my Picasa Blog This! button.  I found out there are many ways out there to edit and post photos.  But, I am partial to Picasa and can post so much faster that way.  Chookyblue sent me a link to one of her posts that shows a really neat way to email photos to your blog from Picasa.  I hope you'll go to her blog and read it if you use Picasa.  


The Blog This button is working again, so now I have two ways to post photos to my blog.


While we were on vacation in Tennessee, I stopped by The Cherry Pit Quilt Shop.  I've been there before, but they are always changing things in their shop.  So I thought I would share a few photos with you.

I love to walk into a quilt shop and see a bed with a quilt on it.  This iron bed makes a beautiful display.  There is a lot to look at just in this one small section of the shop.


There are so many bolts of fabric in this shop that it is hard to see everything.  I love this star quilt.  


There are lots of samples everywhere.


And, here's another bed.  I honestly don't remember seeing it, but it must have been there because it's in the photo.  I might have been focused on the fabric.........


And more fabric....


This is what you see when you first enter the shop.  The valance is made from cherry fabric.  They have a whole section of cherry fabrics.


The window display was really interesting, but my photo has a reflection of the buildings across the street.


The shop is painted a rosy pink color so it is hard to miss.  You can visit their website at:
http://www.quiltingatthecherrypit.com/ and link to their blog from their.  


Thanks for stopping by for a visit!

Print This Post

Related Posts Plugin for WordPress, Blogger...